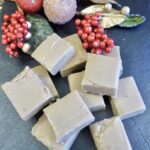

This Creamy Maple Fudge recipe is rich, delicious and downright irresistible, the perfect treat and great for gifting too.
Back in 2015, I discovered a new to me Maple Fudge recipe on the Canadian Living website. Being Canadian as well as British, I have a soft spot for anything maple! I tested and adapted the recipe a little, and then decided to include the recipe in some holiday baking fun with my Goddaughters, Lotte and Kimi over Christmas 2016.
This maple fudge recipe post was originally published in 2016, back when Lotte and Kimi were little. The girls have grown up into wonderful young women, but I cherish memory of the fun we had that day. I’m updating this post now and new photographs are coming soon too as well.

Updated March 2026
Tips for Making This Recipe
Get everything ready before you start. This is one of those recipes you can’t leave on its own, so be sure to have everything you need to hand.
Allow plenty of time for making this maple fudge recipe. You need to allow 2 hours for the mixture to cool before beating it together with the vanilla. This is a really important step that affects the texture of the recipe. After the fudge is in the pan, it needs at least two hours to chill before you cut it.
If you can, make the recipe the day before you need it. The fudge will benefit from chilling over night before being cut into squares.
Be sure to use real maple syrup for this maple fudge recipe. Please do not use ‘pancake syrup’. The texture is different and it does not taste the same.
Do not skimp on the butter when greasing the bowl, saucepan or square pan. The maple fudge mixture is very sticky and it’s a pain if you do not grease them properly.
Be careful. The fudge mixture gets really hot and it’s easy to burn yourself. Be extra careful making any kind of candy with little ones as the hot mixture can be very dangerous. When I made the recipe with Kimi and Lotte, they helped me mix the ingredients together off the heat and then took turns carefully stirring the mixture whilst I held the saucepan. When the mixture got close to the boil, I took over, keeping the kids away from the hot mixture until it had cooled to a safe temperature once again.
Store the finished fudge in a sealed container at room temperature for up to 2 weeks, but bear in mind it tastes best in the first few days after it is made. If you need to stack the pieces of fudge, be sure to put greaseproof paper or baking parchment between the layers or it will stick together. Refrigerating fudge may dry it out, so if you do put it in the fridge be sure the container you use is really airtight.
Maple Fudge is such a treat and it makes a great gift from the kitchen all year round. I like to package it in a cute airtight container, wrap it, and then attach the maple fudge recipe to it so the recipient can make the recipe for themselves too.
Maple Fudge – Printable Recipe

Maple Fudge Recipe
Ingredients
- 2 cups packed dark brown sugar
- 1 cup double cream substitute whipping cream if double cream is not available
- ½ cup pure maple syrup
- 2 tablespoons butter, cut in small pieces plus more for greasing the pan, bowl and saucepan
- ½ teaspoon baking soda
- 1½ teaspoons vanilla
Instructions
- Before you start this maple fudge recipe, prepare a 7 inch square baking dish or cake pan, lightly buttering the sides and lining the bottom with parchment or greaseproof paper.
- Butter a large heat proof bowl and set aside.
- Butter the sides of a large, heavy saucepan.
- Use a wooden spoon to mix together the sugar, cream maple syrup, butter and baking soda in the saucepan before putting it on the heat.
- Put the saucepan on the stove or hob over medium heat.
- Bring the mixture in the saucepan to the boil over medium heat, stirring constantly with the wooden spoon.
- Let the mixture boil, stirring frequently, until a candy thermometer registers 238°F (114°C). (Do not leave the pan unattended!) This is the soft boil stage and can also be judged by dropping about a half teaspoon of the mixture into very cold water. The syrup should form a soft ball that flattens when it is removed from the water.
- Pour the mixture into the greased bowl you prepared earlier. Place the bowl on a rack and let cool in a safe place to 100°F (38°C). This will take about 2 hours.
- Transfer the mixture to the bowl of an electric mixer and beat in the vanilla.
- Continue to beat the mixture at medium high speed for about 7 more minutes until it is lovely and thick and most of the gloss has disappeared.
- Scrape maple fudge mixture into the buttered, parchment lined baking dish or cake pan, smoothing the top.
- Place the pan on a rack and allow to cool thoroughly.
- Chill in the fridge before cutting the maple fudge into small squares.
Notes
Equipment
- 1 large saucepan
did you make this recipe?
Make sure to tag #apriljharris on Instagram and follow @apriljharris for more.
If you enjoyed this recipe, you may also like Apple Pecan Cake with Maple Glaze.
Comments & Reviews
Oh yummy! I have always liked maple syrup, but I have been especially fond of using it in different applications this year. Fudge would be a great use!
Me too, Carlee. I love maple syrup. I hope you enjoy the fudge!
Hello April,
This fudge sounds so amazing. Thanks for sharing the recipe with us at Cooking and Crafting with J & J!!
Have a Happy New Year.
Julie xo
Thank you so much, Julie! Happy New Year to you too! xo
I’ve never tasted such fudge, and they look wonderful!
I want to wish you a wonderful New-Year
May this coming year will be the best ever
(♡˙︶˙♡)
Thank you so much, Winnie and thank you for the lovely New Year wishes too! I hope you will have a wonderful New Year full of happiness!
Sounds wonderful!
Thank you, Pam 🙂
Pure yumminess!
Thank you, Nancy, it really is 🙂
Oh definitely use the real deal Maple Syrup. Your nieces are adorable and it sounds like you had a really fun day. Love the photo layout too!
Thank you, Patty 🙂 They really are sweeties and we had such a fun time!
I adore pure maple syrup and I bet it really enhances the taste of your fudge! What a fun time you must have had with your ‘lil chefs! I wish you and your beautiful family a year filled with good health, happiness and of course lots of delectable yummies! xolinda
It really does, Linda! We had such fun 🙂 Thank you so much for the lovely wishes! Wishing you and yours a healthy, happy and prosperous New Year! xo
April, this sounds wonderful, as I’m not really a huge chocolate fan so have lost interest in making fudge! Real maple syrup has such a wonderful flavor, I’m glad to find another way to use it!
Thank you, Jean, it really is delicious! The maple fudge is somehow less rich than the chocolate variety, although it is still plenty sweet 😉
Your goddaughters are just adorable and what a sweet memory you’ve created for them! This recipe sounds absolutely fantastic!
Thank you so much, Angela 🙂
This sounds so yummy! I’ve pinned it!
Thanks for joining Cooking and Crafting with J & J! Happy 2016!
Thank you, Jess! Happy 2016 to you too 🙂
I love this recipe, I never made fudge but I’ll try your recipe. I like that the ingredients are basic and I can make this on a whim especially when my grandson decides he wants to make something with me. Happy New Year!
Thank you, Joanne! I’m really glad you like the recipe 🙂 Happy New Year!
Lol, I’m frequently on the Canadian Living site also, and lurv me some maple fudge! (All kinds of fudge, really, but maple fudge feels particularly Canadian 😉 ). I’ll definitely have to try making your recipe!
I agree, Danielle, maple fudge really does feel particularly Canadian 😉 Hope you enjoy the recipe when you try it!
Mmm this looks so yummy! I feel like this would taste like pancakes 🙂
Thank you, Emily. It kind of does but without the pancake part 🙂
The fudge sounds so yummy, April! The little girls are just so cute- they look so happy helping their aunt! Pinning and tweeting to try later! Happy holidays! 🙂
Thank you so much, Hadia. We really did have fun. Thank you for pinning and tweeting too! Happy Holidays 🙂
Hello April, this fudge sounds so good! I hope you are enjoying the holidays. Wishing you a Merry Christmas.
Thanks too for sharing this at C&C with J&J!
Julie
Thank you so much, Julie! Wishing you and yours a very Merry Christmas too 🙂
YUMMMM…this sounds amazing!! PINNED!
I would love for you to share this with my Facebook Group for recipes, crafts, tips, and tricks: https://www.facebook.com/groups/pluckyrecipescraftstips/
Thanks for joining Cooking and Crafting with J & J!
Thank you so much, Jess, and thank you for pinning. On my way over to share now 🙂
Yum, I agree the maple fudge would make wonderful festive gifts. Commenting as BritMums Baking Round-up Editor. 🙂
Thank you, Julie 🙂
I followed the instructions exactly and this isn’t my first time making fudge but I’ve been beating it for 10 minutes and it’s not losing its gloss. I wish you posted more pictures of your process. I think I’ve just made ice cream topping, not fudge.
I’m sorry you are having trouble, Heather. I don’t usually do a lot of process photos as I’m more a home cook than a photographer. The recipe has always worked for me, my readers, and for anyone I know personally who has tried it. It’s difficult as obviously I’m not in the kitchen with you – the only thing I can think of if you followed the recipe exactly is whether the mixture wasn’t actually cool enough when you started beating it with the electric mixer. Another possibility would be if your candy thermometer wasn’t accurate. They do wear out after a time. Again, I’m very sorry you’ve had a problem.
The only opportunity I’ve ever had to taste Maple Fudge is when ‘someone’ leaves his open box of Russell Stover chocolate creams out on the coffee table…
Since I recently acquired a jug of real maple syrup I can now whip up (literally) my own tasty treat!
I’m so glad you will get a chance to make your own treat, Thalia. I love maple fudge – well, maple almost anything really!! 🙂 I hope you love the recipe as much as we do at our house!